Did you know that you can navigate the posts by swiping left and right?
Secure CI with GitLab and Hashicorp Vault
28 Feb 2021
. category:
tech
.
Comments
#howto
#gitlab
#vault
#hashicorp'
#nomad
I’ve spent a long time around various build and deploy systems.
One thing they all have in common is they tend to collect permissions to do things. This can be a sizable problem, especially when these systems are shared between multiple areas of an organisation.
This is more often the case than not, since deployment systems are complicated to manage well and usually, a shared service team somewhere ends up doing it. Probably multiple shared services teams if it is a particularly large organisation.
I’m sure anyone reading this that has managed Jenkins and used it to manage AWS infrastructure or deployments has at some point thought to themselves - “Hmm, this Jenkins agent has quite the impressive IAM profile - it could destroy a lot of stuff if a bad actor got control of it…”.
In other words, blast radius becomes a problem.
So how to fix this?
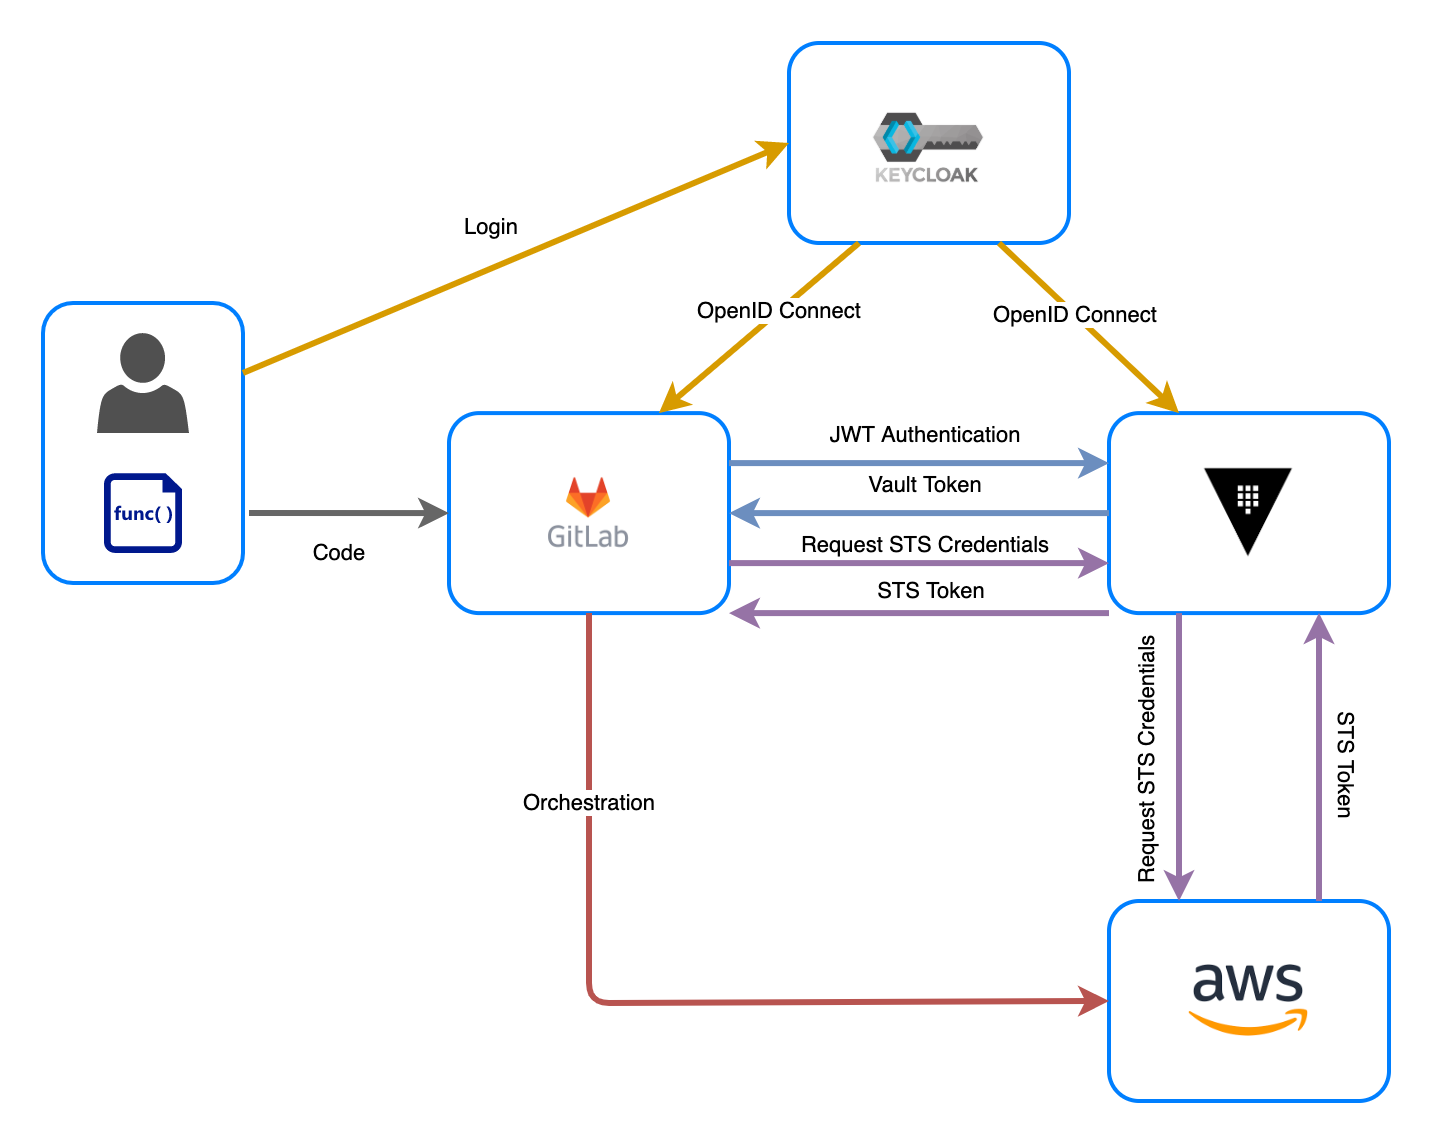
As with anything in computers there are a million different ways i am sure - but here is my approach using GitLab, HashiCorp Vault and Keycloak together. This approach results in the CI workers themselves having zero permissions to AWS or any other infrastructure by default.
Vault has various secrets backends that can be driven by this pattern, so this approach is not limited to AWS.
I myself also make use of the Nomad backend to drive zero-trust deployments from GitLab into a container orchestrator.
Vault has secrets backends for other potential deployment targets such as Kubernetes, various databases, Azure, Google Cloud and more.
How does it work?
This is achieved by using the GitLab JWT issuer feature, combined with the HashiCorp Vault JWT authentication backend. Vault and GitLab authentication are integrated with Keycloak using OpenID Connect so that identity is consistent across the platform.
Implementation
GitLab
Authentication Setup
First, GitLab itself has authentication delegated to Keycloak using OpenID connect. This is done with GitLab’s OmniAuth OIDC provider configuration.
Configuration in GitLab itself is simple. It looks like so:
gitlab_rails['omniauth_providers'] = [
  { 'name' => 'openid_connect',
    'label' => '<your_oidc_label>',
    'icon' => '<custom_provider_icon>',
    'args' => {
      'name' => 'openid_connect',
      'scope' => ['openid','profile'],
      'response_type' => 'code',
      'issuer' => '<your_oidc_url>',
      'discovery' => true,
      'client_auth_method' => 'query',
      'uid_field' => '<uid_field>',
      'send_scope_to_token_endpoint' => 'false',
      'client_options' => {
        'identifier' => '<your_oidc_client_id>',
        'secret' => '<your_oidc_client_secret>',
        'redirect_uri' => '<your_gitlab_url>/users/auth/openid_connect/callback'
      }
    }
  }
]
Additionally there are some general GitLab settings outside of the authentication provider setup. This delegates all authentication in GitLab to a Keycloak instance, along with telling GitLab to sync user profile information from Keycloak:
gitlab_rails['omniauth_allow_single_sign_on'] = ['openid_connect']
gitlab_rails['omniauth_block_auto_created_users'] = false
gitlab_rails['omniauth_external_providers'] = ['openid_connect']
gitlab_rails['omniauth_sync_profile_from_provider'] = ['openid_connect']
gitlab_rails['omniauth_sync_profile_attributes'] = ['name', 'email']
gitlab_rails['omniauth_auto_sign_in_with_provider'] = 'openid_connect'
Once those settings are added restart GitLab and it is good to go.
JWT Issuer
GitLab, by default runs an integrated JWT issuer. This is extremely useful as far as authentication for CI jobs go, as the JWTs issued by GitLab can be used to authenticte with Vault.
GitLab will issue a JWT for every CI pipeline/job that runs, using the identity of the user that triggered the job via merge request/branch push or whatever trigger is configured. These JWTs are valid for the lifetime of the job, so are short-lived.
Those JWTs get encoded with information about the CI job, which can be used in Vault policy to decide if access should be allowed. The GitLab JWTs look like this:
{
  "jti": "c82eeb0c-5c6f-4a33-abf5-4c474b92b558", # Unique identifier for this token
  "iss": "gitlab.example.com",                   # Issuer, the domain of your GitLab instance
  "iat": 1585710286,                             # Issued at
  "nbf": 1585798372,                             # Not valid before
  "exp": 1585713886,                             # Expire at
  "sub": "job_1212",                             # Subject (job id)
  "namespace_id": "1",                           # Use this to scope to group or user level namespace by id
  "namespace_path": "mygroup",                   # Use this to scope to group or user level namespace by path
  "project_id": "22",                            #
  "project_path": "mygroup/myproject",           #
  "user_id": "42",                               # Id of the user executing the job
  "user_login": "myuser"                         # GitLab @username
  "user_email": "myuser@example.com",            # Email of the user executing the job
  "pipeline_id": "1212",                         #
  "job_id": "1212",                              #
  "ref": "auto-deploy-2020-04-01",               # Git ref for this job
  "ref_type": "branch",                          # Git ref type, branch or tag
  "ref_protected": "true",                       # true if this git ref is protected, false otherwise
  "environment": "production",                   # Environment this job deploys to, if present (GitLab 13.9 and later)
  "environment_protected": "true"                # true if deployed environment is protected, false otherwise (GitLab 13.9 and later)
}
This provides a lot of useful information for making decisions within Vault policy, as it includes important information such as the GitLab project group and path, environment, as well as crucially, the GitLab users identification from the OIDC provider.
Vault
The Vault side of things is also simple to configure.
We need an authentication backend, and for the purposes of proving the principal a couple of Vault roles to request from within a CI/CD pipeline in GitLab.
I already have the AWS backend configured, which gives Vault the ability to issue STS tokens for configured IAM roles. I also have the Nomad backend configured, which gives Vault the ability to issue Nomad tokens tied to specific Nomad ACL policies.
Configuration
Configuration of Vault is simplest with Terraform. First add the authentication backend itself:
resource "vault_jwt_auth_backend" "gitlab_jwt" {
    description  = "JWT Authentication backend for the GitLab CI/CD server"
    path = "jwt"
    jwks_url = "https://gitlab.example.com/-/jwks"
    bound_issuer = "gitlab.example.com"
}
Add a Vault role for GitLab to use to authenticate itself.
This role will allow any GitLab project within the namespace your/group/* to authenticate against the role using the generated JWT for the job. As you can see, we could check various GitLab JWT bound_claims here.
resource "vault_jwt_auth_backend_role" "gitlab_jwt_auth_backend_role" {
  backend         = vault_jwt_auth_backend.gitlab_jwt.path
  role_name       = "gitlab-terraform-role"
  token_policies  = ["vault-gitlab-terraform"]
  token_explicit_max_ttl = 600
  user_claim = "user_email"
  role_type       = "jwt"
  bound_claims_type = "glob"
  bound_claims = {
    project_path = "your/group/*"
  }
}
And the policy
data "template_file" "vault_gitlab_terraform_policy_template" {
  template = file("${path.module}/vault-gitlab-terraform-policy.hcl")
}

resource "vault_policy" "vault_gitlab_terraform_policy" {
  name = "vault-gitlab-terraform"
  policy = data.template_file.vault_gitlab_terraform_policy_template.rendered
}
The policy file contents itself. This example is somewhat contrived since in a real environment you’d have different backend roles:
# Generate a Nomad token for job deployment in a specific namespace
path "nomad/creds/operations"
{
  capabilities = ["read"]
}

# Generate temporary STS credentials for Route53 administration of a specific Hosted Zone
path "aws/sts/aws-route53-admin"
{
  capabilities = ["update"]
}
Thats it. GitLab now has permission to request secrets from Vault in specific jobs for specific purposes!
Vault Enterprise
One thing to add here is that Vault Enterprise adds the Control Groups and Sentinal Policy Language features, which can compliment all of this significantly.
Firstly, control groups could be used to pause a CD pipeline deployment in production until a human confirms access is allowed via the use of a control group policy.
Secondly, Sentinal can be used to drive fine-grained descisions on policy using the GitLab JWT token information. For example, a conditional requirement on access that says production requirements require the control group flow described above, whereas in development environments it does not.
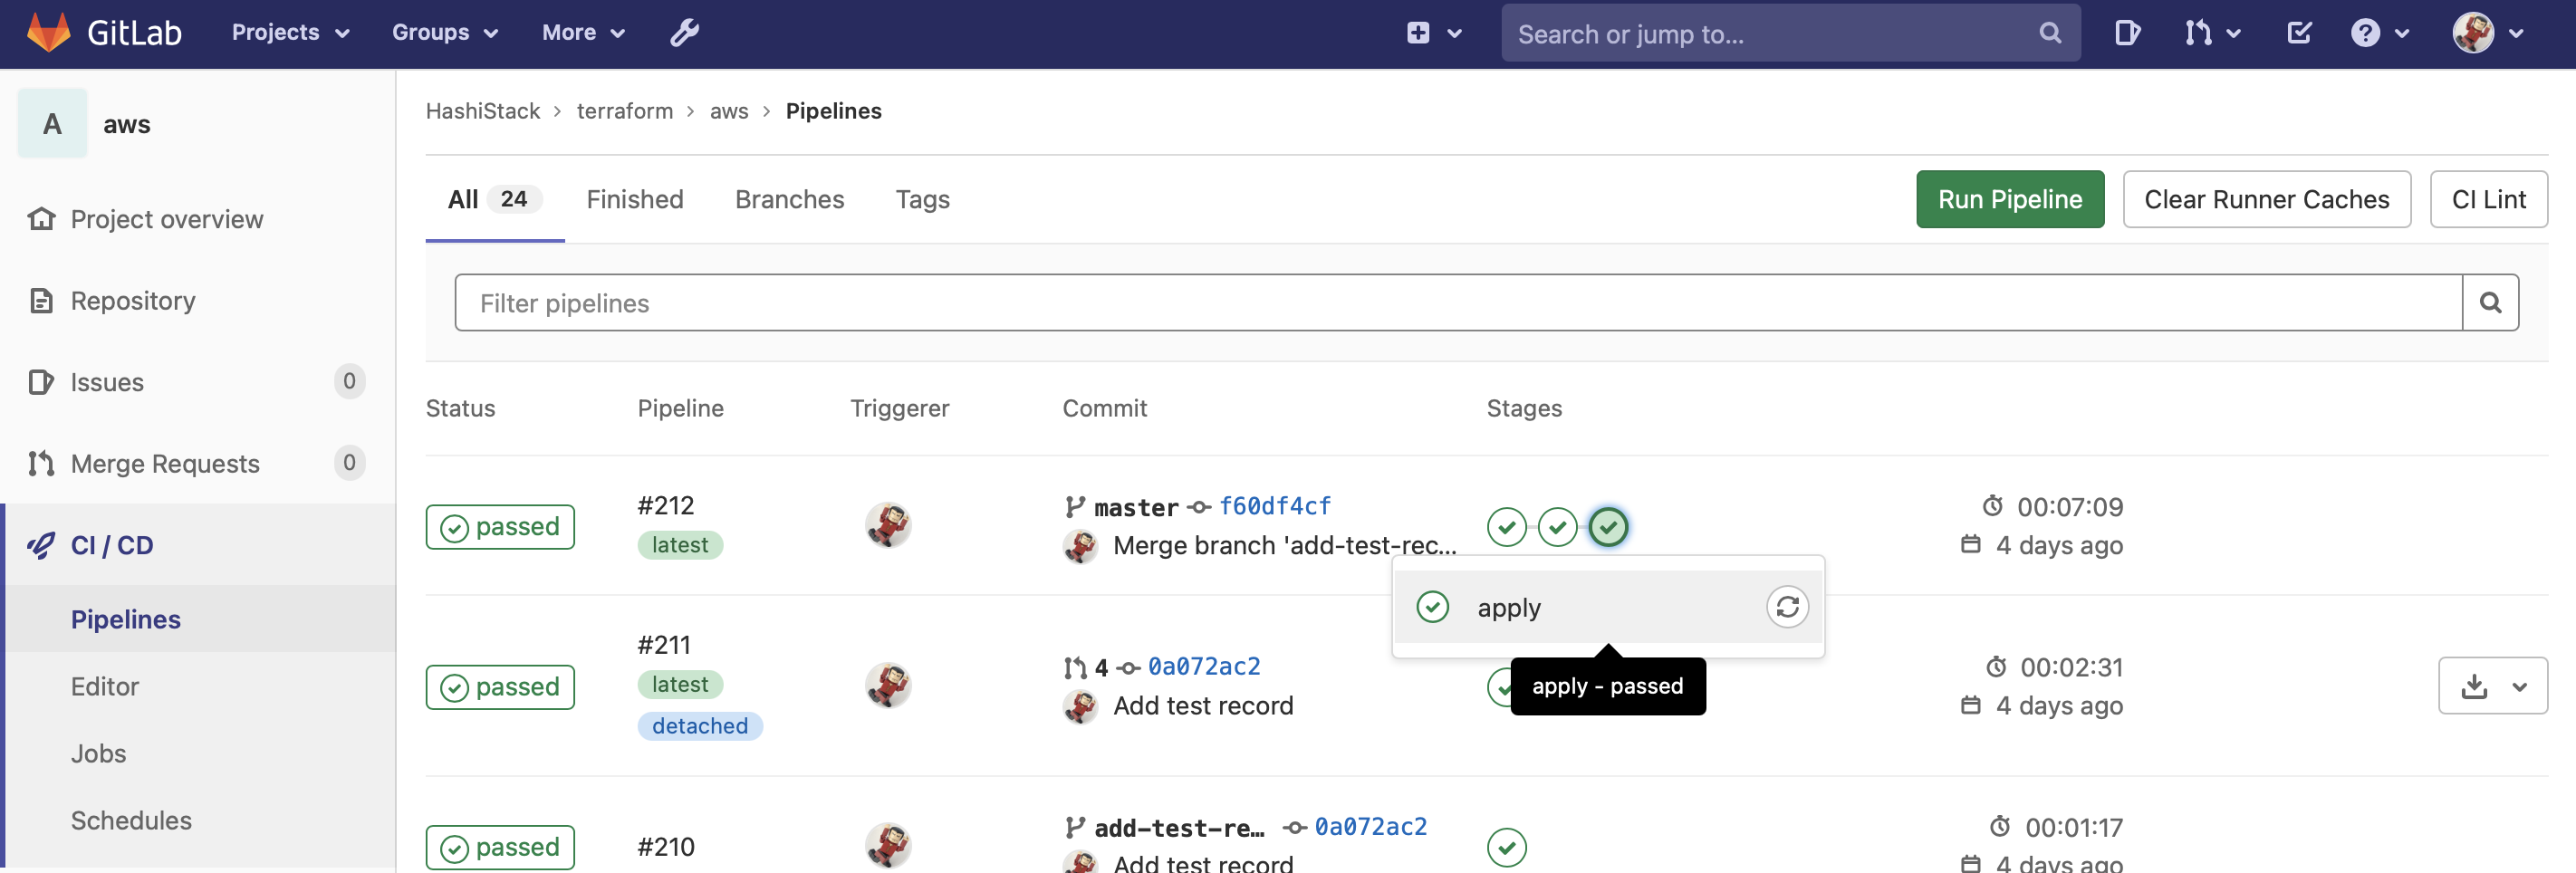
Pipelines
So, putting all this together results in a GitLab CI Pipeline. Here is an example I am using to manage deployments into AWS:
image: terraform:latest
services:

variables:
  PLAN: plan.tfplan
  JSON_PLAN_FILE: tfplan.json
  TF_IN_AUTOMATION: "true"

before_script:
  - terraform --version
  - terraform init

stages:
  - validate
  - plan
  - apply

validate:
  stage: validate
  script:
    - terraform validate
  only:
    - branches

merge review:
  stage: plan
  script:
    - export VAULT_ADDR=http://active.vault.service.consul:8200
    - export VAULT_TOKEN="$(vault write -field=token auth/jwt/login role=gitlab-terraform-role jwt=$CI_JOB_JWT)"
    - eval $(vault write -force -format json aws/sts/aws-terraform-admin | jq -r '.data | "export AWS_ACCESS_KEY_ID=\(.access_key)\nexport AWS_SECRET_ACCESS_KEY=\(.secret_key)\nexport AWS_SESSION_TOKEN=\(.security_token)"')
    - terraform plan -out=$PLAN
    - env
    - echo \`\`\`diff > plan.txt
    - terraform show -no-color ${PLAN} | tee -a plan.txt
    - echo \`\`\` >> plan.txt
    - sed -i -e 's/  +/+/g' plan.txt
    - sed -i -e 's/  ~/~/g' plan.txt
    - sed -i -e 's/  -/-/g' plan.txt
    - MESSAGE=$(cat plan.txt)
    - >-
      curl -X POST -g -H "PRIVATE-TOKEN: ${GL_MR_DISCUSSION_TOKEN}"
      --data-urlencode "body=${MESSAGE}"
      "${CI_API_V4_URL}/projects/${CI_PROJECT_ID}/merge_requests/${CI_MERGE_REQUEST_IID}/discussions"
  artifacts:
    name: plan
    paths:
      - $PLAN
  only:
    - merge_requests

plan production:
  stage: plan
  script:
    - export VAULT_ADDR=http://active.vault.service.consul:8200
    - export VAULT_TOKEN="$(vault write -field=token auth/jwt/login role=gitlab-terraform-role jwt=$CI_JOB_JWT)"
    - eval $(vault write -force -format json aws/sts/aws-terraform-admin | jq -r '.data | "export AWS_ACCESS_KEY_ID=\(.access_key)\nexport AWS_SECRET_ACCESS_KEY=\(.secret_key)\nexport AWS_SESSION_TOKEN=\(.security_token)"')
    - terraform plan
  only:
    - master
  resource_group: production

apply:
  stage: apply
  script:
    - export VAULT_ADDR=http://active.vault.service.consul:8200
    - export VAULT_TOKEN="$(vault write -field=token auth/jwt/login role=gitlab-terraform-role jwt=$CI_JOB_JWT)"
    - eval $(vault write -force -format json aws/sts/aws-terraform-admin | jq -r '.data | "export AWS_ACCESS_KEY_ID=\(.access_key)\nexport AWS_SECRET_ACCESS_KEY=\(.secret_key)\nexport AWS_SESSION_TOKEN=\(.security_token)"')
    - terraform apply -auto-approve
  dependencies:
    - plan production
  artifacts:
    expire_in: 1 week
    name: $CI_COMMIT_REF_SLUG
  only:
    - master
  resource_group: production
  environment:
    name: production
This is a fairly standard CI/CD pipeline for AWS.
On a push to a branch, the pipeline will run terraform validate.
For every merge request raised, it will run terraform plan and attach the results of that plan to the merge request as a comment.
I have the GitLab repository itself configured to only allow a merge after all comments are resolved and the CI pipeline has been sucessful.
Once the MR is merged, terraform apply is run to apply the plan. This is all fine and ususal but the interesting part is in these 2 lines:
- export VAULT_TOKEN="$(vault write -field=token auth/jwt/login role=gitlab-terraform-role jwt=$CI_JOB_JWT)"
- eval $(vault write -force -format json aws/sts/aws-terraform-admin | jq -r '.data | "export AWS_ACCESS_KEY_ID=\(.access_key)\nexport AWS_SECRET_ACCESS_KEY=\(.secret_key)\nexport AWS_SESSION_TOKEN=\(.security_token)"')
First, this authenticates the CI job with Vault, and stores the returned Vault token in an environment variable. This token is tied to specific Vault policies by the role configued in Vault.
Next, the pipline requests temporary AWS credentials from Vault to allow runnning Terraform against the AWS infrastructure. These AWS credentials are requested using the vault token retrieved in the previous step.
The pipline can now complete using the generated temporary credentials, and the GitLab runner itself has no inherant permission to AWS.
As mentioned above, this can be used for many deployment targets from within a GitLab pipeline. For example, the same for Nomad:
- export VAULT_TOKEN="$(vault write -field=token auth/jwt/login role=gitlab-nomad-role jwt=$CI_JOB_JWT)"
- export NOMAD_TOKEN="$(vault read -field=secret_id nomad/creds/operations)"